Thursday 16 November 2017

SCCM 2012 R2 Step by Step Installation Guide

The following guide will take you through the installation of SCCM 2012 R2 with a simple Primary Server approach and with the SQL server located on the same device. It assumes that no earlier version of SCCM is installed in the Active Directory domain it is being installed into.
Before installing SCCM 2012 R2 you will need to run through some prep work to get the Active Directory configured and extended, along with some application and role/feature installs

Prepare Active Directory for Configuration Manager

Create the System Management Container in AD

Connect to a domain controller and load ADSI Edit. Under the System OU create a new Object.
R201
Choose Container and click Next.
R202
Enter the name System Management and click Next.
R203
Complete the wizard and close ADSIEdit.
Delegate control to the SCCM site server to the newly created container in AD Users and Computers. Create a custom task to delegate and choose ‘This folder, existing objects in this folder and creation of new objects in this folder’
R204
R205
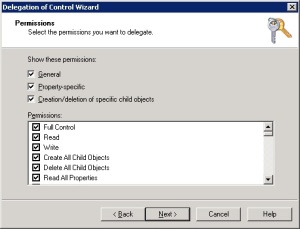
Check all Permission boxes and complete the wizard
R205a

Extend the Schema

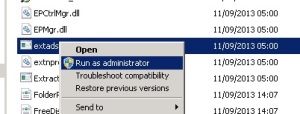
From the SCCM 2012 media copy the \SMSSetup\Bin\x64\ folder to a Domain Controller holding the Schema Master Role. Ensure the account used is a member of the Schema Admins group in AD.  Right click the Extadsch.exe and choose ‘Run as Administrator ‘.
R206
A log file ‘ExtADSch.log’ will be generated on the root of the C: Drive. Check for the entry ‘Successfully extended the Active Directory schema.’
<01-01-2014 21:25:22> Successfully extended the Active Directory schema.
To check what Extadsch.exe is doing to the Active Directory then open up the file ConfigMgr_ad_schema.ldf that is located in the same folder.

Install Site Server Prerequisites

The following roles and features need to be installed onto the SCCM Site Server prior to installation:
  • BITS
  • Remote Differential Compression
  • IIS Components
  • .Net Framework 3.5
Add the following IIS components
Common HTTP Features Static Content
Default Document
Directory Browsing
HTTP Errors
HTTP Redirection
Application Development
ASP.NET
.NET Extensibility
ASP
ISAPI Extensions
ISAPI Filters
Health and Diagnostics
HTTP logging
Logging tools
Request Monitor
Tracing
Security
Basic Authentication
Windows Authentication
URL Authorization
Request Filtering
IP and Domain Restrictions
Performance
Static Content Compression
Management Tools
IIS Management Console
IIS Management Scripts and Tools
Management Service
IIS 6 Management Compatibility
IIS 6 Metabase Compatibility
IIS 6 WMI Compatibility
IIS 6 Scripting Tools
IIS 6 Management Console

Install Windows Assessment and Deployment Kit (Windows ADK) for Windows 8.1

Go to http://www.microsoft.com/en-gb/download/details.aspx?id=39982 and download ADK 8.1.
Run the adksetup.exe file. Accept the licence agreement. This will download and install .Net Framework 4.5.
R209
Restart the system when prompted.
R210
After the restart setup will resume. Accept the default location for installation and click Next.
R211
Select whether to join the CEIP and click Next.
R212
Accept the licence agreement.
R213
Install the following components and then click Install.
  • User State Migration Tool (USMT)
  • Windows Deployment Tools
  • Windows PreInstallation Environment (Windows PE)
R214
R215
Once complete click Close.
R216

Install SQL Server

SQL Server 2012 SP1 is being installed as the SCCM database.
Run the setup.exe
Install a new stand-alone installation of SQL
R217
Click Ok.
R218
Install the product key or run in evaluation mode. Click Next.
R219
Accept the licence agreement and click Next.
R220
Include any product updates.  Click Next.
R221
Click Next.
R222
Choose the feature installation and click Next.
R223
Install the selected features and click Next.
R224
Click Next.
R225
Leave as the default instance and click Next.
R226
Click Next at the disk space requirements screen.
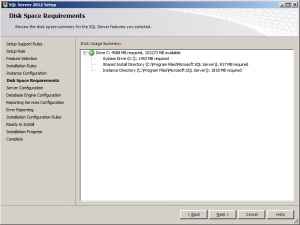
R227
Set any account to run the SQL services, in this instance the defaults have been selected. Once confirmed, click the Collation tab.
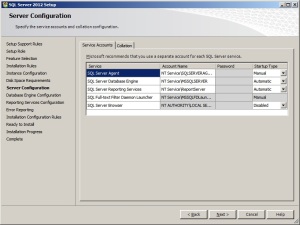
R228
Click the Customize button.
R229
Choose the ‘SQL Collation, used for backwards compatibility’ option and choose SQL_Latin1_General_CP1_CI_AS. Click Ok. Click Next.
R230
Use Windows authentication and Add the current user. Click Next.
R231
Set Reporting Services to install only. Click Next.
R232
Set error reporting preferences and click Next.
R233
Click Next.
R234
Click Install to begin the installation process.
R235
Once installed open up SSMS and limit the amount of RAM SQL can use to 50% of total RAM. Set the value for both max and min.
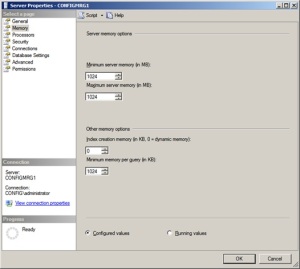
R235a
Set SQL to run with either a named domain account, network service or local system account. If using a named account grant the log on as a service right via gpedit.msc or GPO.
SQLService

Install SCCM 2012 R2

Begin the install of SCCM 2012 R2 by running splash.hta. Click Install.
R237
Click Next.
R237a
Choose to install a primary site in this instance. Click Next.
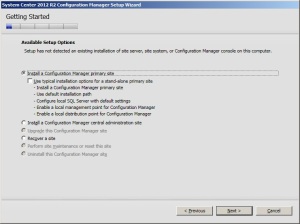
R238
Enter a licence key or evaluate. Click Next.
R239
Accept the licence agreement and click Next.
R240
Accept pre-req licences and click Next.
R241
Create a folder to store install updates and point the SCCM install to that location. Click Next.
R242
Updates will download and install.
R243
Select any language requirements for the SCCM server and click Next.
R244
Select any client language requirements and click Next.
R245
Enter a 3 digit site code and description and click Next. Be aware of Microsoft list of pre-reserved site code names. http://support.microsoft.com/kb/279868/en-us
R246
Choose whether to run the primary as stand-alone or join to an existing hierarchy. Click Next.
R247
In this instance a stand-alone primary is being installed. Click Yes to accept.
R248
Accept the database default configuration and click Next.
R249
Specify the path to the SQL database file and log file. In this instance it is the defaults. Click Next.
R250
Click Next to set the current server as the SMS Provider
R251
Set ‘Configure the communication method on each site system role’ as a PKI infrastructure is not being used. Click Next.
R252
Install both a MP and a DP onto the site server. Click Next.
R253
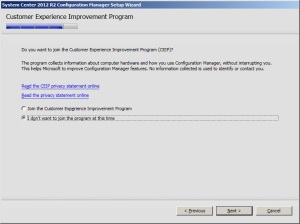
Choose whether to join the CEIP. Click Next.
R254
Click Next at the Summary screen.
R255
The following warnings can be ignored at the pre-req check screen. Click Begin Install.
R256
SCCM will begin the installation.
R257
Click close when complete.
R258
Launch the SCCM Console. Ensure the site and database report as healthy in the Monitoring workspace under System Status>Site Status
R2459


How to Setup iTOP (IT Operational Portal) on CentOS 7 

iTOP is a simple, Open source web based IT Service Management tool. It has all of ITIL functionality that includes with Service desk, Configuration Management, Incident Management, Problem Management, Change Management and Service Management. iTop relays on Apache/IIS, MySQL and PHP, so it can run on any operating system supporting these applications. Since iTop is a web based application you don’t need to deploy any client software on each user’s PC. A simple web browser is enough to perform day to day operations of an IT environment with iTOP.
To install and configure iTOP we will be using CentOS 7 as base operating with basic LAMP Stack environment installed on it that will cover its almost all prerequisites.

Downloading iTOP

iTop download package is present on SourceForge, we can get its link from their official website link.
We will the download link from here and get this zipped file on server with wget command as below.
[root@centos-007 ~]# wget http://downloads.sourceforge.net/project/itop/itop/2.1.0/iTop-2.1.0-2127.zip

iTop Extensions and Web Setup

By using unzip command we will extract the downloaded packages in the document root directory of our apache web server in a new directory with name itop.
[root@centos-7 ~]# ls
iTop-2.1.0-2127.zip
[root@centos-7 ~]# unzip iTop-2.1.0-2127.zip -d /var/www/html/itop/
List the folder to view installation packages in it.
[root@centos-7 ~]# ls -lh /var/www/html/itop/
total 68K
-rw-r--r--. 1 root root 1.4K Dec 17 2014 INSTALL
-rw-r--r--. 1 root root 35K Dec 17 2014 LICENSE
-rw-r--r--. 1 root root 23K Dec 17 2014 README
drwxr-xr-x. 19 root root 4.0K Jul 14 13:10 web
Here is all the extensions that we can install.
[root@centos-7 2.x]# ls
authent-external itop-backup itop-config-mgmt itop-problem-mgmt itop-service-mgmt-provider itop-welcome-itil
authent-ldap itop-bridge-virtualization-storage itop-datacenter-mgmt itop-profiles-itil itop-sla-computation version.xml
authent-local itop-change-mgmt itop-endusers-devices itop-request-mgmt itop-storage-mgmt wizard-icons
installation.xml itop-change-mgmt-itil itop-incident-mgmt-itil itop-request-mgmt-itil itop-tickets
itop-attachments itop-config itop-knownerror-mgmt itop-service-mgmt itop-virtualization-mgmt
Now from the extracted web directory, moving through different data models we will migrate the required extensions from the datamodels into the web extensions directory of web document root directory with copy command.
[root@centos-7 2.x]# pwd
/var/www/html/itop/web/datamodels/2.x
[root@centos-7 2.x]# cp -r itop-request-mgmt itop-service-mgmt itop-service-mgmt itop-config itop-change-mgmt /var/www/html/itop/web/extensions/

Installing iTop Web Interface

Most of our server side settings and configurations are done.Finally we need to complete its web interface installation process to finalize the setup.
Open your favorite web browser and access the WordPress web directory in your web browser using your server IP or FQDN like.
http://servers_ip_address/itop/web/
You will be redirected towards the web installation process for iTop. Let’s configure it as per your requirements like we did here in this tutorial.
Prerequisites Validation
At the stage you will be prompted for welcome screen with prerequisites validation ok. If you get some warning then you have to make resolve it by installing its prerequisites.
mcrypt missing
At this stage one optional package named php mcrypt will be missing. Download the following rpm package then try to install php mcrypt package.
[root@centos-7 ~]#yum localinstall php-mcrypt-5.3.3-1.el6.x86_64.rpm libmcrypt-2.5.8-9.el6.x86_64.rpm.
After successful installation of php-mcrypt library we need to restart apache web service, then reload the web page and this time its prerequisites validation should be OK.
Install or Upgrade iTop
Here we will choose the fresh installation as we have not installed iTop previously on our server.
Install New iTop
iTop License Agreement
Chose the option to accept the terms of the licenses of all the components of iTop and click "NEXT".
License Agreement
Database Configuration
Here we the do Configuration of the database connection by giving our database servers credentials and then choose from the option to create new database as shown.
DB Connection
Administrator Account
In this step we will configure an Admin account by filling out its login details as.
Admin Account
Miscellaneous Parameters
Let's choose the additional parameters whether you want to install with demo contents or with fresh database and proceed forward.
Misc Parameters

iTop Configurations Management

The options below allow you to configure the type of elements that are to be managed inside iTop like all the base objects that are mandatory in the iTop CMDB, Manage Data Center devices, storage device and virtualization.
Conf Management
Service Management
Select from the choices that best describes the relationships between the services and the IT infrastructure in your IT environment. So we are choosing Service Management for Service Providers here.
Service Management
iTop Tickets Management
From the different available options we will Select the ITIL Compliant Tickets Management option to have different types of ticket for managing user requests and incidents.
Ticket Management
Change Management Options
Select the type of tickets you want to use in order to manage changes to the IT infrastructure from the available options. We are going to choose ITIL change management option here.
ITIL Change
iTop Extensions
In this section we can select the additional extensions to install or we can unchecked the ones that you want to skip.
iTop Extensions

Ready to Start Web Installation

Now we are ready to start installing the components that we choose in previous steps. We can also drop down these installation parameters to view our configuration from the drop down.
Once you are confirmed with the installation parameters click on the install button.
Installation Parameters
Let's wait for the progress bar to complete the installation process. It might takes few minutes to complete its installation process.
iTop Installation Process

iTop Installation Done

Our iTop installation setup is complete, just need to do a simple manual operation as shown and then click to enter iTop.
iTop Done

Welcome to iTop (IT Operational Portal)

itop welcome note

iTop Dashboard

You can manage configuration of everything from here Servers, computers, Contacts, Locations, Contracts, Network devices…. You can create your own. Just the fact, that the installed CMDB module is great which is an essential part of every bigger IT.
iTop Dashboard

Conclusion

ITOP is one of the best Open Source Service Desk solutions. We have successfully installed and configured it on our CentOS 7 cloud host. So, the most powerful aspect of iTop is the ease with which it can be customized via its “extensions”. Feel free to comment if you face any trouble during its setup.


Install & Configure IT Operational Portal Using iTop On RHEL/CentOS 6x 

Q. What is iTop?

-- iTop, stands for IT Operational Portal, is an Open Source web based application for the day to day operations of an IT environment. iTop was designed with the ITIL best practices in mind but does not dictate any specific process, the application is flexible enough to adapt to your processes whether you want rather informal and pragmatic processes or a strict ITIL aligned behaviour.

  • Using iTop you can :
- Document your entire IT infrastructure assets such as servers, applications, network devices,
   virtual machines, contacts.. etc.
- Manage incidents, user requests, planned outages.
- Document IT services and contracts with external providers including service level agreements.
- Export all the information in a manual or scripted manner.
- Import or synchronize/federate any data from external systems.

  • Features :
- Fully configurable CMDB.
- HelpDesk and Incident Management.
- Service and Contract Management.
- Change Management.
- Configuration Management.
- Automatic SLA management.
- Automatic impact analysis.
- CSV import tool for all data.
- Consistency audit to check data quality.
- Data synchronization (data federation).

Configuration :

Step: 1. Install EPEL Repo :

# yum -y install epel-release

Step: 2. Install Apache Server :

# yum -y install httpd httpd-devel mod_ssl wget

Step: 3. Start Apache Server :

# service httpd restart
# chkconfig httpd on

Step: 4. Install Mysql Server :

# yum -y install mysql mysql-server mysql-devel

Step: 5. Set MySQL Root Password :

# service mysqld restart
# chkconfig mysqld on

# mysql_secure_installation

Step: 6. Install PHP5 Scripting Language :


# yum -y install php php-mysql php-common php-gd php-mbstring php-mcrypt php-devel \
   php-xml php-imap php-ldap php-mbstring php-odbc php-pear php-xmlrpc php-soap \
   php-cli graphviz

Step: 7. We need to Adjust the following PHP Settings :

# vi /etc/php.ini

post_max_size = 32M

-- Save & Quit (:wq)

Step: 8. Restart Apache Server To Load the New Configuration :

# service httpd restart

Step: 9. Download & Install iTop :

# yum -y install zip unzip
# cd /var/www/html
# wget http://sourceforge.net/projects/itop/files/itop/2.0.2/iTop-2.0.2-1476.zip
# unzip iTop-2.0.2-1476.zip
# mv web itop
# rm -rf iTop-2.0.2-1476.zip INSTALL LICENSE README

Step: 10. Create the following Directory & Make them to be Writable :

# mkdir /var/www/html/itop/conf
# mkdir /var/www/html/itop/data
# mkdir /var/www/html/itop/env-production
# mkdir /var/www/html/itop/log
# chmod 777 /var/www/html/itop/conf/
# chmod 777 /var/www/html/itop/data
# chmod 777 /var/www/html/itop/env-production/
# chmod 777 /var/www/html/itop/log

Step: 11. Finally, Install iTop Using Web Browser :

http://Server_ip_address/itop

-- Click on "Continue"
-- Select "Install a New iTOP"
-- Click on "Next"
-- I Accept the Agreement.
-- Click Next
-- MySQL Sever Details :
     Server Name: localhost,
     Login: root,
     Password: redhat

Database :

Select Create a new Database: itopdb
-- Click Next.

Administrator Account :

Login: admin
Password: Passw0rd
Confirm password: Passw0rd

-- Language: English
-- Click Next.

Sample Data :

If you directly use it in production environment, then select the second option and Click Next. I want to populate my database with some demo data’s, so checked the first option.

-- Click Next.
-- Click Next.
-- Select "Service Management for Enterprises"
-- Click Next.
-- Select "ITIL Compliant Tickets Management" & Check 'User Request Management' &  
     'Incident Management'
-- Then Click Next
-- Select "ITIL Change Management"
-- Click Next.
-- Check Both Option 'Known Errors Management' & 'Problem Management'
-- Click Next.
-- Click Install.
-- Finally Click on Enter iTop.


Wednesday 1 July 2015

Active Directory: DSQUERY Commands


DSQUERY Commands to query AD objects:-

 1. How to find all members for a particular group

  dsget group "<DN of the group>" -members
1a. How to find all groups for a particular member (including nested groups)

  dsget user "<DN of the user>" -memberof -expand
  dsquery user -samid "username" | dsget user -memberof -expand

2. How to find memberof , lastlogontimestamp , homemta(Mail server) , Samaccountname & so on(Repadmin /showattr <DCname> <"DN">)
 dsquery * "<DN>" -scope base -attr lastlogontimestamp memberoff

 repadmin /showattr <DCNAME> <"DN"> /attrs:lastlogon,homemta,whencreated,lastlogontimestamp,samaccountname

3. How to modify user last name.
 dsmod user <dn> -ln "<last name>"

4. How to find memberof , lastlogontimestamp , homemta(Mail server) , Samaccountname & so on for "n" number of users
 Create a batch file(for /f "eol= tokens=* delims= usebackq" %%x in (%1) do dsquery * %%x -scope base -attr sAMAccountName objectsid whencreated  lastlogontimestamp mail homeMTA memberof) e.g ds.bat

 Create a text file (All users DN e.g:dn.txt)

 Open cmd & run ds.bat dn.txt >> c:\attr.txt

5. How to find DN for n number of computers
 for /f %%x in (%1) do dsquery computer -name %%x

  (Create a batch file with line & create a txt file computer.txt

  open cmd >>>>>>batchfile computer.txt >> c:\dn.txt

6. Find Subnet with associated site.
  dsquery subnet -name <CIDR> | dsget subnet

8.How to find disabled users
  dsquery user "dc=ssig,dc=com" -disabled

  dsquery * -filter "(&(objectCategory=person)(objectClass=user)(userAccountControl:1.2.840.113556.1.4.803:=2))"

9. How to find OS?
 dsquery * <"DN"> -scope base -attr operatingSystem

10. How to find site ?
 dsquery site -name * -limit 0
 dsquery server -s <server> | dsget server -site

11. How to get tombstonelifetime ?
 dsquery * "CN=Directory Service,CN=Windows NT,CN=Services,CN=Configuration,DC=yourdomain,DC=com" -scope base -attr tombstonelifetime

13. How to find mail box?

 dsquery * -filter "samaccountname=biswajit" -attr homemdb

14. How to find the GCs?
 DsQuery Server -domain contoso.com -isgc

15.How to find all the active users?

 dsquery * -filter "(&(objectCategory=person)(objectClass=user)(!userAccountControl:1.2.840.113556.1.4.803:=2))"

16.How to find users logon name by their mail address for bulk users?

 For Single user

  dsquery * domainroot -filter "(&(objectCategory=Person)(objectClass=User)(mail=e-mailaddress))" -attr name

  For bulk users

  for /f %%x in (%1) do dsquery * domainroot -filter "(&(objectcategory=person)(objectclass=user)(mail=%%x))" -attr name


17. How to find Schema version?

  dsquery * cn=schema,cn=configuration,dc=domainname,dc=local -scope base -attr objectVersion
  or
  schupgr


18. How to find Site name by server name ?

  dsquery server -name test1 | dsget server -site

  dsquery server -name (provide the server name for DN) | dsget server -site
19. How to find all groups of a user is memberof without the DN's?

  dsquery user -samid anthony | dsget user -memberof | dsget group -samid

  dsquery user -samid (provide the samaccount name of the user) | dsget user -memberof | dsget group -samid

20. How to find all groups if a computer account without giving the DN's ?

  dsquery computer -name test1 | dsget computer -memberof | dsget group -samid

21. How to find PDC role holder for the existing domain ?

  dsquery server -hasfsmo PDC

22. How to find Infrastructure Master role holder existing domain ?

  dsquery server -hasfsmo INFR

23. How to find RID master role holder for existing domain ?

  dsquery server -hasfsmo RID

24. How to find Schema master role holder in a Forest ?

  dsquery server -forest -hasfsmo Schema

25. How to find Domain Naming Master in a Forest ?

  dsquery server -forest -hasfsmo Name

26. How to find if the Domain Controller is a Global Catalog (GC) or not ?

  dsquery server -name test1 | dsget server -isgc

27. How to find subnet with associated site.

  dsquery subnet -name 10.222.88.0/25 | dsget subnet
28.  How to find SID of a user?

  dsquery user -samid <bbiswas> | dsget user -sid
  dsquery * -filter (samaccountname=Biswajit) – attr sid

29.  How to find sIDHisotry of a user?

  Dsquery * -filter (samaccoutname=Bbiswas) – attr siDhistory

30.  How to find enabled computer accounts in an OU?

 dsquery computer OU=Test,DC=contoso,DC=com -limit 5000 | dsget computer -dn -disabled | find /i " no"

31.  How to count enabled computer accounts in an OU?

 dsquery computer OU=Test,DC=contoso,DC=com -limit 5000 | dsget computer -dn -disabled | find /c /i " no"

32. How to find all members for a OU.
dsquery user ou=targetOU,dc=domain,dc=com

33. How to find all groups for a OU.

dsquery group ou=targetOU,dc=domain,dc=com

dsquery group -samid “Group Pre-Win2k Name” | dsget group -members | dsget user -disabled -display

35.Command to find all the subnets for the given site 
dsquery subnet -o rdn -site <site name>

36. Command to find all DCs in the given site

>>dsquery server -o rdn -site <site name>

37. Command to find all DCs in the Forest

>>dsquery server -o rdn -forest

38. To list the distinguished names of all directory partitions in the current forest
>>dsquery partition 

Below example for single domain

Below example for parent/child domain

39. To find all contacts in the organizational unit (OU)

dsquery contact OU=Sales,DC=Contoso,DC=Com

40. To list the relative distinguished names of all sites that are defined in the directory

dsquery site -limit 0

41. List of all users with primary group "Domain Users"

dsquery * -filter "(primaryGroupID=513)" -limit 0

(You can change the "primaryGroupID" as per your requirement)

513:Domain Users
514:Domain Guests
515:Domain Computers
516:Domain Controllers

42. How to find all attributes for all users?

Dsquery * -limit 0 -filter "&(objectClass=User)(objectCategory=Person)" -attr * >>output123.txt

43. Show How Many Times wrong Password has been entered on a specified domain controller.

dsquery * -filter "(sAMAccountName=jsmith)" -s MyServer -attr givenName sn badPwdCount


The badPwdCount attribute is not replicated, so a different value is saved for each user on each domain controller.

44. Expire use account.

dsquery * "dc=contoso,dc=com" -filter "(&(objectCategory=Person)(objectClass=User)(!accountExpires=0)(!accountExpires=9223372036854775807)) " -attr sAMAccountname displayName

Fine Granted Password Policy

http://social.technet.microsoft.com/wiki/cfs-file.ashx/__key/communityserver-components-sitefiles/10_5F00_external.png 
i)
dsget user <user DN> -effectivepso

Example:
 
C:\>dsget user "CN=bshwjt,OU=pso,DC=contoso,DC=com" -effectivepso
effectivepso
"CN=test,CN=Password Settings Container,CN=System,DC=contoso,DC=com"
dsget succeeded
("bshwjt" is the user and test is the "PSO" also see the below snap)

ii) How to find the PSO settings

 
C:\>dsquery * "<CN=your pso name>,CN=Password Settings Container,CN=System,DC=contoso,DC=com" -scope base -attr *

46. Find out Account Expiry date  

dsquery user -name * -limit 0 | dsget user -samid -acctexpires

47.This example displays all attributes of the contoso.com domain object

dsquery * -filter (dc=contoso) -attr *


48.This complex example displays the names of all attributes (150) that Windows Server 2003 replicates to Global Catalog servers. (If the command displays no attributes, ensure that you typed TRUE in capital letters

dsquery * cn=Schema,cn=Configuration,dc=contoso,dc=com -filter "(&(objectCategory=attributeSchema)(isMemberOfPartialAttributeSet=TRUE))" -limit 0 -attr name


49. How to get all samaacount name ?

dsquery user -o rdn -limit 0

50.The command displays the DNS host name, the site name, and whether the server is Global Catalog (GC) server for each domain controller

dsquery server | dsget server -dnsname -site -isgc
Get all the servers in the forest

dsquery server -forest -limit 0 | dsget server -dnsname -site -isgc

51.The dsget command displays properties of users or other objects. In this example, it displays the 6 groups that explicitly list the Administrator as member

Note: The -memberof -expand combination recursively expands the list of groups of which the user is a member. In this example, the Users group is added to the list because Domain Users is a member of the Users group.

dsget user cn=Administrator,cn=Users,dc=contoso,dc=com -memberof 

52.The output of the dsquery command can be used as input for the dsget command by using a pipe ( | ). In this example, the SAM account name and the security ID (SID) of each user is displayed.

dsquery user | dsget user -samid -sid -limit 0 >> c:\Allusers-samid-sid.txt

53. How to find 
RODC ?

dsquery server -isreadonly

Dsquery for exchange server

54. How to find the Schema Version for Exchange Servers.

dsquery * CN=ms-Exch-Schema-Version-Pt,cn=schema,cn=configuration,dc=domain,dc=local -scope base -attr rangeUpper

55.How to find lastLogonTimestamp for all users for a domain

dsquery * -filter "&(objectClass=person)(objectCategory=user)" -attr cn lastLogonTimestamp -limit 0

56. Inactive users are go to disable state

dsquery * <ou> -filter "(&(objectCategory=Person)(objectClass=User)(!accountExpires=0)(!accountExpires=9223372036854775807))" | dsmod user -disabled yes  

57.ADDS existing connection point objects
dsquery * forestroot -filter (objectclass=serviceconnectionpoint)

58. Find all Hyper-V hosts in your forest
C:\>dsquery * forestroot -filter "&(cn=Microsoft Hyper-V)(objectCategory=serviceconnectionpoint)" -attr servicebindinginformation >> c:\hyper-v.txt

59. Find all windows virtual machine in your forest
C:\>dsquery * forestroot -filter "&(cn=windows virtual machine)(objectCategory=serviceconnectionpoint)" -limit 0 -attr * >> c:\allvirtualPCs.txt
60.Extract the all groups from an OU with Group Scope & Group Type. Find the below snap for your reference.

C:\>dsquery group "ou=test,dc=gs,dc=com" -limit 0 | dsget group -samid -scope -secgrp

61.The following example displays a list of users of the Organigation Unit "Techie Sol",
can then be forwarded to dsget that can provide detailed information about objects.
In the example, the requested user list is headed by the pipe symbol after dsget that
-outputs then the sAMAccountName for all users and email address.
If you wanted to carry out modifications to the information returned by DSQuery user list,
we could send the result to dsmod, which for us is making changes to all users.
In following Image shows the changes in the command ensures that all users of DSQuery
-user list must change their passwords in next logon.

Another way to get the user attributes from an OU. Find the below snap & dsquery for that.

C:\>dsquery * "ou=test,DC=contoso,DC=com" -filter "(&(objectcategory=person)(objectclass=user))" -limit 0
-attr samaccountname description department title

62.retrieve the DN of all users in the domain that are not direct members of a specified group
dsquery * -filter "(&(objectCategory=person)(objectClass=user)(!(memberOf=Groupname,ou=West,
dc=Contoso,dc=com))) -limit 0 > NotInGroup.txt

63. How to open DSQUERY GUI Window

rundll32 dsquery,OpenQueryWindow

DNS application partition

64. How to find the DNS servers from DomainDNSZones & ForestDNSzones

C:\>dsquery * DC=DomainDnsZones,DC=contoso,DC=com -scope base -attr msDs-masteredBy
C
:\>dsquery * DC=forestDnsZones,DC=contoso,DC=com -scope base -attr msDs-masteredBy

65.Finding the Functional Levels of Active Directory

dsquery * "DC=contoso,DC=com" -scope base -attr msDS-Behavior-Version ntMixedDomain
0, 0        Windows 2000 Native domain Level
0, 1        Windows 2000 Mixed domain Level
2, 0        Windows 2003 Domain Level
3, 0        Windows 2008 Domain Level
4, 0        Windows 2008 R2 Domain Level